Are you asking yourself how to set up and re-authenticate auto-posting with Planoly? We’ve all been there. In fact, you’re one of the many people who come to us with this very question! We truly love this social media scheduling platform to plan, organize, and analyze Instagram and Pinterest posts. However, it certainly has its third-party issues—usually with Instagram.
That’s why we’ll start there. If you don’t have an Instagram for Business account (sometimes you get downgraded back to a personal profile without your knowledge), this can be a factor with Planoly auto-post issues. If that’s not the case, then we’ll show you how to set up Instagram auto-posting. We’ll also cover how to re-authenticate with Facebook so you can auto-post there. So take a deep breath and read on! We’ll make sure we thoroughly troubleshoot auto-post issues with Planoly so you can get back to your set-it-and-forget-it social media management.
FYI, you should use your smartphone to do the following steps. These troubleshooting tips are meant to work with the apps and those work best through your phone versus desktop.
How to Set Up Instagram Auto-posting with Planoly
Step 1. Make Your Instagram, Facebook, and Pinterest Accounts Public
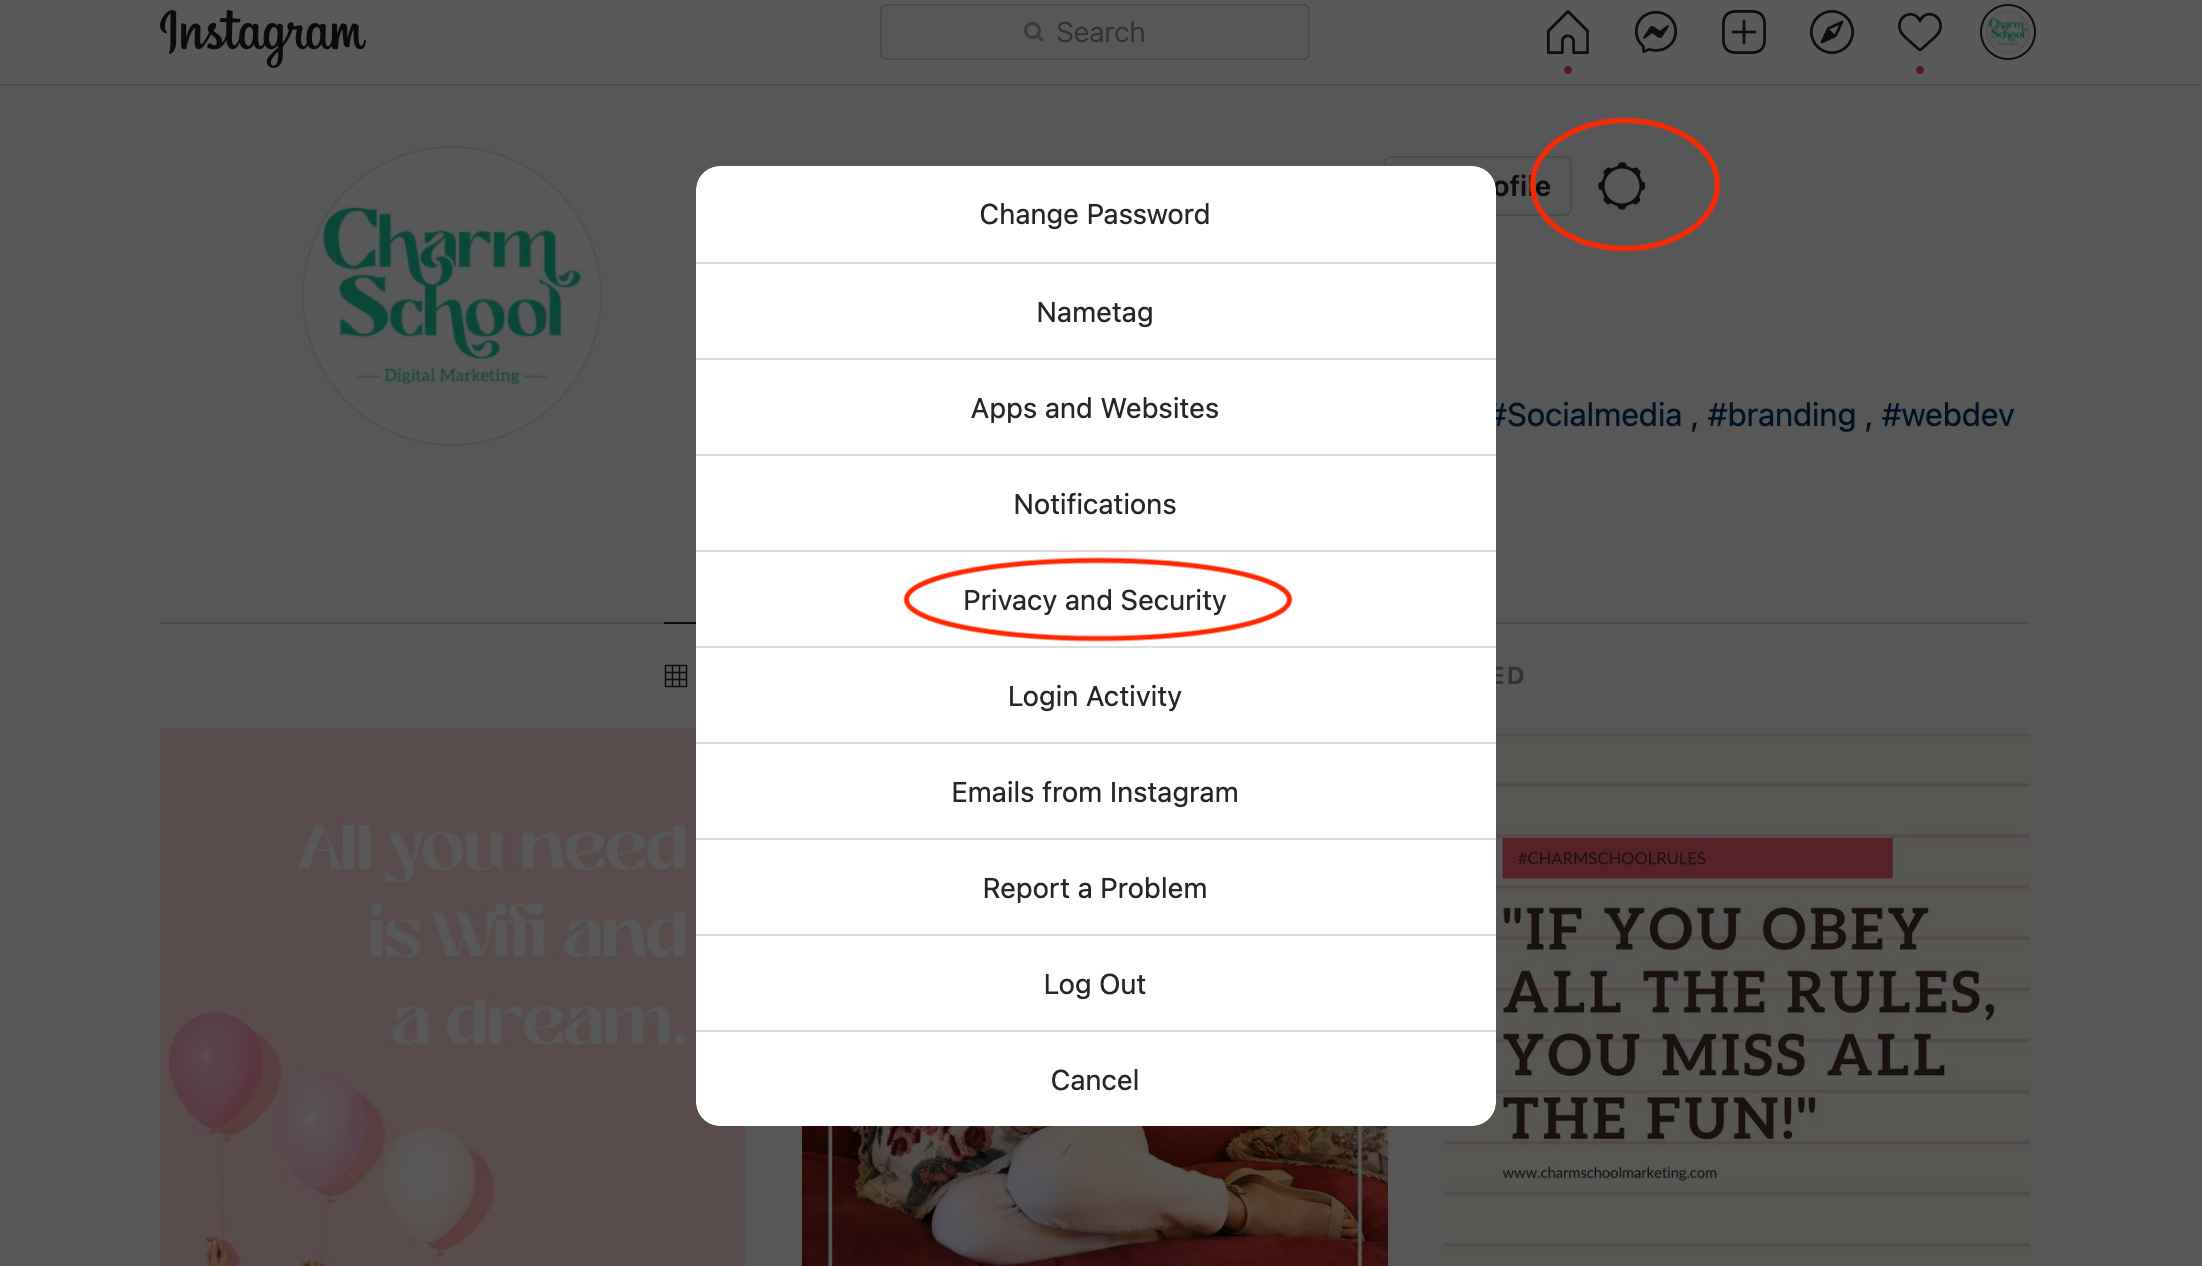
Log into your Instagram account. Now, click the little sun at the top of your profile. Then, click “Privacy and Security.” Check to see if your profile is set to public. If it isn’t, deselect the “Private Account” box. Simple as pie.

Step 2. Open your Instagram App and Go into Settings
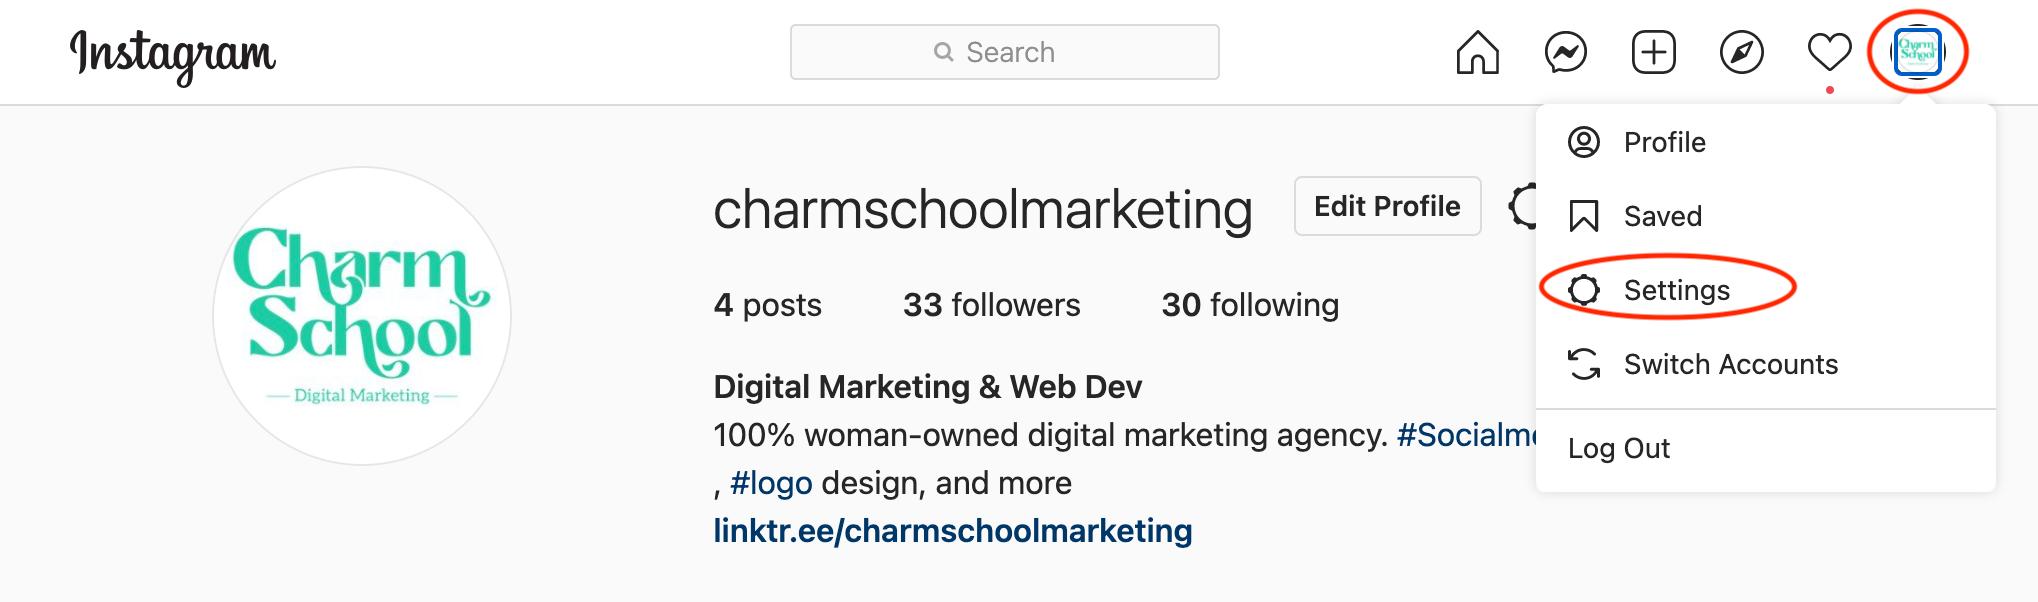
Now, go to “Settings” by tapping your profile image in the upper right corner of your screen. Then, click on “Settings.”
Step 3. Change Your Profile to a Business Account
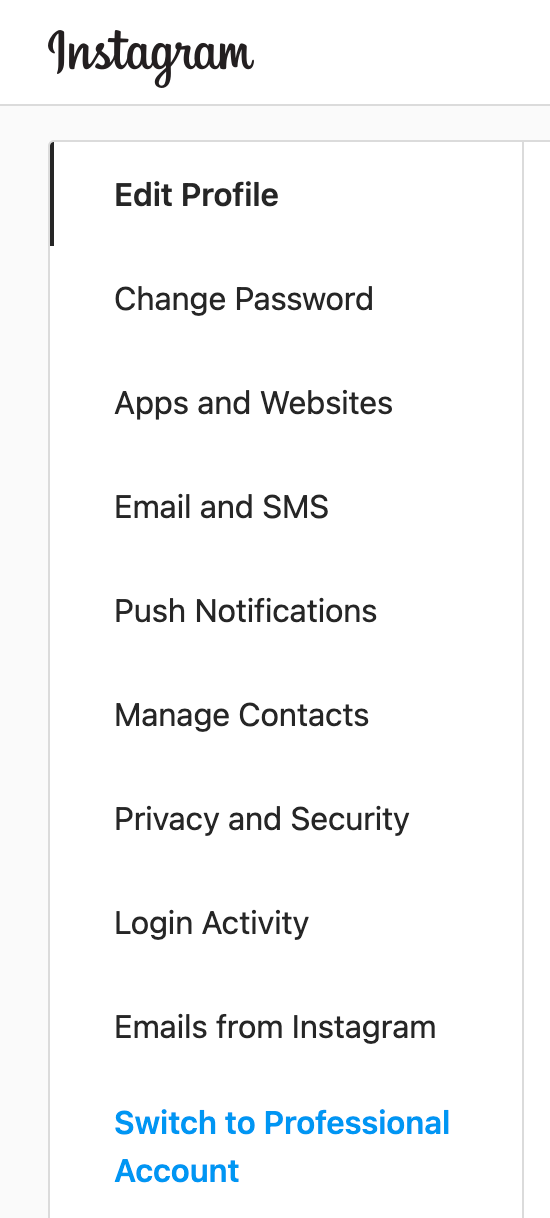
Look at the left-hand side of your screen to locate the menu. At the very bottom, you’ll see an option to “Switch to Professional Account.” Tap on that text!
Select if you’re a business or a creator.

Choose the option to convert your personal Instagram account to a Business account or a Creator account. You’ll have to link your Facebook account as well since the company owns both platforms. Now, you’re ready to move on to setting up auto-posting with Planoly. Woot woot!
Step 4. Open the Planoly App and Log In
Log into your Planoly account via the Planoly app on your phone. Click the three lines at the top right of your screen and tap “My Profile.”

After you click, keep scrolling until you see “Managed Social Profiles.” This is where you can connect your Instagram for Business profile. You should see an option that says”Auto-post.”
Turn on Planoly auto-posting by switching the toggle button to “YES” for Facebook and Instagram. The prompts will be your yellow brick road from here. You’ll have to link Facebook in order to auto-post and authenticate your accounts with Planoly.

Troubleshoot Auto-posting Issues with Planoly
How to Re-authenticate Your Facebook Business Profile to Auto-Post with Planoly
Are you getting an error message that your scheduled post couldn’t auto-post? Or, that you need to re-authenticate your Facebook account to enable auto-posting? Or, do you see a red “S” in your scheduled posts in Planoly showing that a scheduled post never went live? Argh! This is super annoying, but a quick fix to get you back up and running. The tips below will help you solve this common issue with Planoly.
Step 1b. Re-link your Facebook account in Planoly
Planoly is usually on top of alerting you of issues with re-authenticating. If it does, you should follow the prompts in your Planoly app. Usually, that will get the job done. As long as you’re signed in to your Facebook Business account, this should be a piece of cake. Every now and again, you’ll have to do this manually. Here’s how.
2. Try Repeating Step four above. You may only have to click to enable auto-post to Instagram again. However, if that doesn’t work, then move on to the next step.
Step 2b. Go to Your Settings in Facebook Business Integrations
Try manually unlinking your Facebook and Planoly accounts. The easiest way to do this is to log into Facebook Business on desktop. Click on Business Integrations settings. That link will help you find where to click as Facebook settings are long and confusing at times. When you’re in Business Integrations settings, you should see Planoly on the list.
If it’s not there, then you know Planoly hasn’t been linked to your Facebook business account. I’m sorry, but you landed on the return to start space. Womp freaking womp. Just scroll back up to step one in this blog and start over to link Planoly and Facebook.

If your Planoly is connected and/or listed in Facebook settings, click “View and Edit.” There, you’ll see what Facebook and Planoly share. Planoly should say “Active” in green.

Step 3b: Ensure You’re Scheduling Content That Can Be Auto-Posted
Before you move onto the next step, make sure your scheduled auto-post content meets Planoly’s specifications. If Planoly is listed and active, you may not need to remove it. You may just have to change the size images and types of content you’re scheduling in Planoly.
Step 4b: Disconnect Your Planoly and Facebook Accounts
Sometimes you need to start fresh by disconnecting accounts. Remove Planoly from your integrated Facebook accounts by clicking “Remove.” This really is a last-ditch effort to right the ship once you’ve tried all of your other troubleshooting options.
Just DO NOT CHECK THIS BOX spotlighted below. It can cause content published from Planoly to your Facebook Business account to be deleted. You don’t want to lose all of your content, likes, etc. So be extra careful not to select “Delete posts, videos or events Planoly posted on your timeline.” Only click the “Remove” button.

Step 5b: Re-authenticate Facebook with Planoly
Get back into your Planoly app. It should automatically prompt you to re-authenticate your Facebook account. Just follow the steps it lays out for you. After you do, enable auto-posting again and go through all of your future posts to make sure the little auto-post airplane appears in the corner next to the “S.” For a few days, monitor your social media feeds to make sure auto-post content is in fact posting as scheduled. If it does, you’ll know you successfully re-authenticated your Facebook auto-posting. Woohoo!

Need Help with Your Social Media Marketing?
Hire Charm School Marketing’s Social Media Managers
Planoly is one of our favorite social media management tools to work with—hiccups aside. However, if social media management is taking up too much of your time, we’re here to help.
Download our Ultimate Social Media Strategy Guidebook for DIY Social Media Management Tips
If you’d like to explore other social media scheduling tools or learn more to empower your in-house social media, download our Ultimate Social Media Strategy Guidebook! We also have a suite of affordable social media tools for DIY marketing.